Hello Friends,One of the great new development improvements for Microsoft Dynamics AX 2012 is "Eventing". For most people, that have ever done any Object oriented development or programming, eventing is a concept that most familiar.
You could do event handling in earlier versions too but in AX 2012, event handling is better than previous version. Now it uses the concepts of delegates, event handlers etc...
Everybody must have seen that there are very few customers that use out of the box AX without any customization's I would say not even a single customer. All customers are required to customize AX to fulfill their business needs. Sometimes, customization's become so large that it becomes difficult to upgrade when Microsoft does make changes in the lower layer. Finally, it becomes cost/budget issue so event handling mechanism in AX 2012 will help to lower the cost of developing customization's and then upgrading these customization's.
Events are simple and powerful concept. In daily life, we encounter with so many events. Events can be used to support these programming paradigms.
1) Observation: Generate alerts to see exceptional behavior.
2) Information dissemination: To convey information to right people at right time.
3) Decoupling: Consumer doesn't need to know about producer. Producer and Consumer can be sitting in totally different applications.
Terminology
AX 2012 events are based on .NET eventing concepts.
Event: An action that needs to be triggered
Event Payload: Information that can go along with event.
Now, let me show you how to use events in AX 2012.
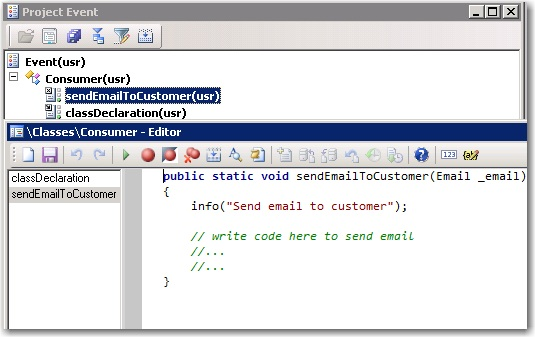
1. Let’s create a class Consumer to create EventHandler (sendEmailToCustomer). This will be called once order is shipped so that email can be sent to customer to notify. It has to be static method.
AX 2012 events are based on .NET eventing concepts.
Producer: Object to trigger the event.
Consumer: Object to consume the event and process logic based on the event triggered.Event: An action that needs to be triggered
Event Payload: Information that can go along with event.
Things to remember while using Events in AX2012
(1) Delegate keyword to use in delegate method.
(2) Public or any other accessibility specifier is not allowed in a delegate method.
(3) Delegate Method return type must be void.
(4) Delegate Method body must be empty.
(5) A delegate declaration can have the same type of parameters as a method.
(6) Event handlers can run only on the same tier as the publisher class of the delegate runs on.
(7) Handler can be implemented either in X++ or in managed code.
(8) Only static methods are allowed to be event handlers.
(9) Delegate method can’t be called outside class. Basically, events can’t be raised outside class in which event is defined.
(10) Event handlers for host methods can use one of two parameter signatures:
(i) One parameter of the type XppPrePostArgs. Go through all the methods available in XppPrePostArgs.
(ii) The same parameters that are on the host method that the event handler subscribes to.
Now, let me show you how to use events in AX 2012.
1. Let’s create a class Consumer to create EventHandler (sendEmailToCustomer). This will be called once order is shipped so that email can be sent to customer to notify. It has to be static method.
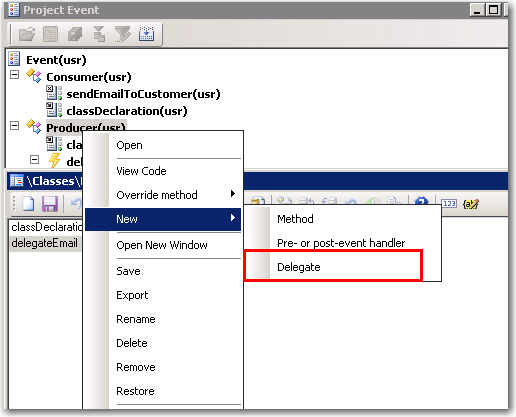
2. Now let’s create Producer class where this event (sendEmailToCustomer) is called using Delegates. Add delegate by right clicking on Producer class > New > Delegate.
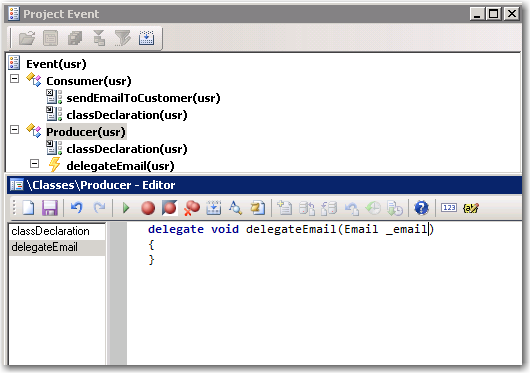
3. Change its name to delegateEmail (you can have any name). Parameter should be same as event handler method (sendEmailToCustomer) i.e. of type Email. Notice it has no body and is a blank method.
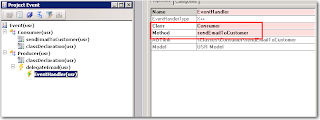
4. Now drag and drop sendEmailToCustomer method from Consumer class to delegateEmail.
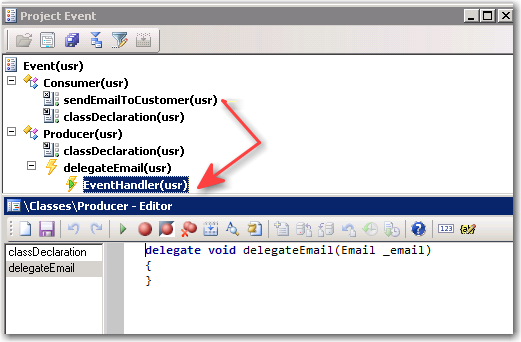
5. Look at properties of EventHandler. You will notice it is pointing to Class Consumer and method sendEmailToCustomer
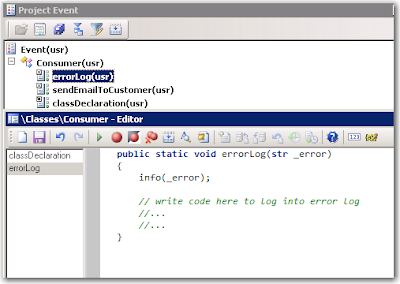
6. If order is not shipped, I am creating another event handler (errorLog) in Consumer class to log error into error log.
7. Create another delegate method (delegateErrorLog) in Producer class to call this event handler (errorLog)

8. Drag and drop event handler (errorLog) in delegate method (delegateErrorLog) similar to step 4.
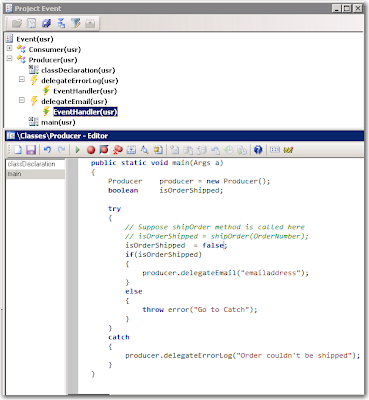
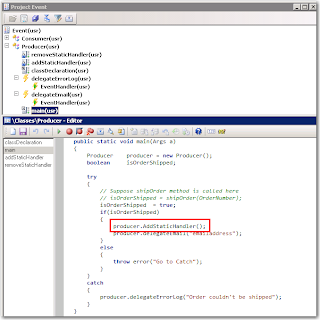
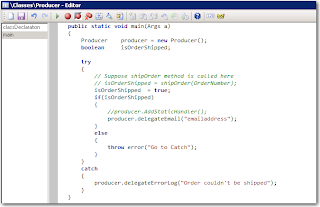
9. Now let’s create main method in Producer class to ship order and let’s see how delegates can be used to trigger event handlers.
9. Now let’s create main method in Producer class to ship order and let’s see how delegates can be used to trigger event handlers.

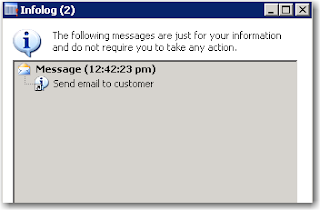
10. Suppose shipOrder method returns true. Now, if I run this main method, it should go into delegateEmail method and should trigger method sendEmailToCustomer. Let’s run and see the result. 11. Here is the result and it is as expected so it did trigger method sendEmailToCustomer.
11. Let’s suppose shipOrder method returns false. Now, if I run this main method, it should go into delegateErrorLog method and should trigger method errorLog. Let’s run and see the result.
12. Here is the result and it is as expected so it did trigger method errorLog.

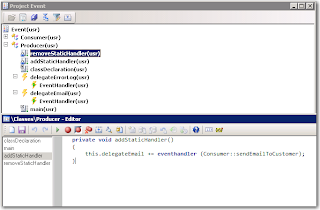
13. Handlers can also be added/removed in x++.
Add Handler: It uses += sign

With use of events, it has opened so many doors and possibilities. Model architecture and events can be integrated which can help if multiple vendors are doing customizations in different models so that it doesn’t impact customizations of other models/vendors. Use of pre and post handlers is so powerful that it can be used without changing a single line of code in original method. Pre or Post handlers can be just dropped in the original method and will be called automatically before (pre handler method) or after (post handler method) original method.
.
Remove Handler: It uses -= sign.
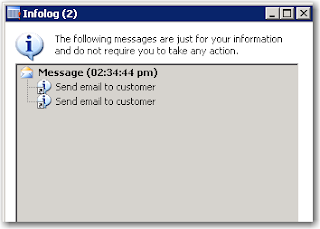
14. Now, let’s use addStaticHandler in main method. If you see the code, it is calling addStaticHandler before calling delegate method. If we run it and see the result, it should send 2 emails.
15. Here is the result as expected.
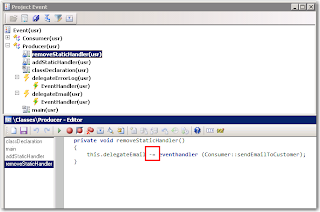
7. Similarly if we use removeStaticHandler method instead of addStaticHandler before calling delegate method then it will remove handler and will not send any email.
So, you can see that with the use of delegates and event handlers, it is so easy to trigger events. Also, it will be easy and less time consuming to upgrade it. Suppose if delegates are called from standard methods while doing customizations then it will be so easy to upgrade if standard methods are changed in next release because only 1 liner code of calling delegate method needs to be rearranged and no changes will be required in event handler methods.
Use of Pre and Post event handlers
In AX 2012, any event handler method can dropped in other method. If the property “CalledWhen” is set to “Pre” then it becomes pre event handler. If it is set to “Post” then it becomes post event handler. Pre event handler is called before the method under which it is dropped and Post event handler is called after method ends. These are so powerful that event handler method can be created in new class and can be dropped in any standard or any other method without changing a single line of code and can be set as pre or post event handler as per business need. Suppose, before creating a customer in AX, business need is to do some business logic then logic can be written in pre event handler and can be dropped in insert method of CustTable. Similarly, if there is post logic to be written after customer is created then post event handler can be created and dropped in insert method of CustTable.
Let’s see how pre and post event handler methods can be created and used.
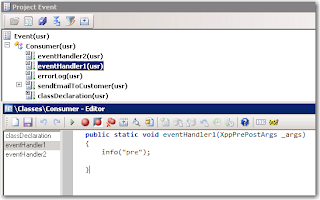
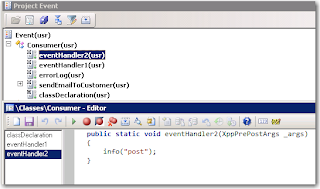
1. Let’s take same example. I added 2 event handler methods in Consumer class.
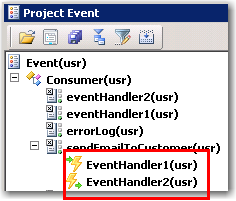
2. Drag and drop both these event handlers in method sendEmailToCustomer
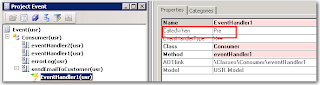
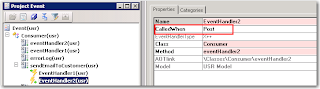
3. Set property “CalledWhen” to Pre for EventHandler1 and Post for EventHandler2.
4. Now let’s run main method of Producer class again and see the results. It should call EventHandler1 and then sendEmailToCustomer and then EventHandler2.
5. Here is the result as expected.
With use of events, it has opened so many doors and possibilities. Model architecture and events can be integrated which can help if multiple vendors are doing customizations in different models so that it doesn’t impact customizations of other models/vendors. Use of pre and post handlers is so powerful that it can be used without changing a single line of code in original method. Pre or Post handlers can be just dropped in the original method and will be called automatically before (pre handler method) or after (post handler method) original method.
Stay tuned for more on events. I am still exploring the possibilities using events in AX 2012.

